Order to Cash Cycle:-
The Order to Cash flow is the complete process of entering an order into the system (Sales Order), delivery the good(s) (Shipping), and then producing the Invoice for the good(s) which are Ordered by the Customer.

1. Required Setups:-
2. Create Customer
3. Create Item
4. Organization Overview
5. Available Inventory
6. Price List
7. Defaulting Rules
1 Defaulting Rules:-
Defaulting rules determine the values that you want to get defaulted into a sales order to reduce the amount of information you need to enter manually. We can create and modify defaulting rules, in which case the Defaulting Generator concurrent program needs to be run.
In this test flow, however, we will only look at an existing seeded defaulting rule for the field Order Type. Based on that, we will set up a default value for the Order Type at the customer’s Invoice To location level.
Change the Responsibility to Order Management Super user (Vision Operations) Responsibility and Navigate to Setup > Rules > Defaulting.
Click on the Flashlight icon, and select the entity Order Header.
In the Attributes section, place the cursor on the line with Attribute = Order Type, and click on the Defaulting Rules button.
As per the Screen Shot below when entering a sales order, the Order Type will default to the value set up at the Invoice To, Ship To, and finally the Customer, wherever it is found first in that sequence.

Set up a default value for Order Type at the customer’s Invoice To level.
Navigate to Customers > Standard.
In the Find/Enter Customer screen, enter your customer name and click on Find.
In the next Match Results screen, make sure you place the cursor on the row with a value in the Customer Number field, and click on OK.
In the Addresses tab, place the cursor on the row for your address and click on Open.
In the Business Purpose tab, place the cursor on the row for the usage ‘Bill To’ and click on Open. This is the ‘Invoice To’ level we saw in the previous step.
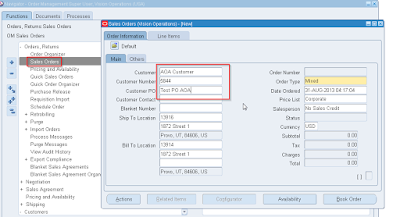
Go to the Order Management tab, and enter the Order Type ‘Mixed’. Save.


Make sure the Ship To/Bill To Locations are defaulted in.
Order Type : Mixed
Price List : Corporate
Salesperson : No Sales Credit
and in Others tab
Payment Terms : N30
Warehouse : M1.
Go to the Line Items tab, and enter the following information as shown in the screen shot:
Make sure the Ship To/Bill To Locations are defaulted in.
Order Type : Mixed
Price List : Corporate
Salesperson : No Sales Credit
and in Others tab
Payment Terms : N30
Warehouse : M1.
Go to the Line Items tab, and enter the following information as shown in the screen shot:
In the Shipping tab, notice that the Warehouse is M1. This is the warehouse from which the item will be shipped out to the customer.

Save the Order.
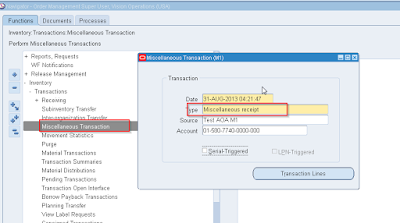
Now increase the on hand Quantity of the Item in M1 inventory Org by doing a Miscellaneous Transaction of Receipt type.
Change the Organization to M1 and Navigate to Transactions –> Miscellaneous Transaction
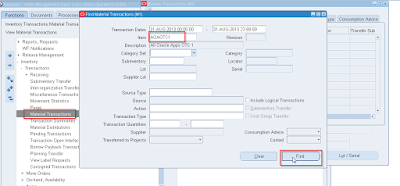
Once the Record is saved we can find a Material Transaction Entry is created as well and can be seen from Transactions –> Material Transaction. Pass the Item Number as the Parameter and Click on Find to view the transaction.
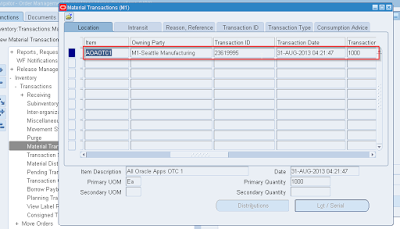
A transaction Entry would be found for the Miscellaneous Transaction Created.
Now navigate to the Sales Order and Query for the Order we have Created which is 66429.
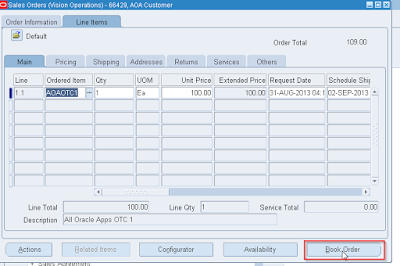
Now Click on the button ‘Book Order’ in the header or lines.
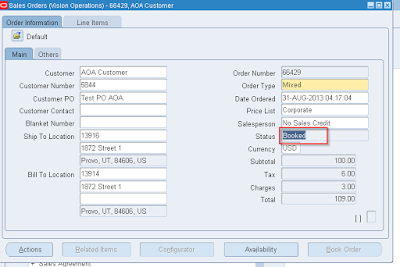
Once the Order is Booked we should see a note saying Order has been booked. Notice the status of the order header has changed from Entered to ‘Booked’, and the status of the line (check the Status field in the Main tab of the lines) has changed from Entered to ‘Awaiting Shipping’.
Once the Order is Booked a soft reservation is created and records are inserted into MTL_DEMAND, MTL_RESERVATIONS, OE_ORDER_LINES_ALL, OE_ORDER_HEADERS_ALL.
SELECT *
FROM mtl_reservations
WHERE demand_source_line_id = 399282;
SELECT *
FROM mtl_demand
WHERE demand_source_line = 399282;
SELECT *
FROM oe_order_lines_all
WHERE header_id = 203331;
SELECT *
FROM oe_order_headers_all
WHERE order_number = 66429;
Once the Order is Booked we can see the Order Status Changed to Booked and Line Status Changed to Awaiting Shipping.
SELECT source_header_number,
source_header_id,
source_line_id,
delivery_detail_id,
released_status
FROM wsh_delivery_details
WHERE source_code = 'OE'
AND source_line_id = 399282;
Pick Release:-
Pick Release is the process of putting reservation on on-hand quantity available in the inventory and pick them for particular sales order. Pick release can be done from ‘Release Sales Order’ form or ‘Pick release SRS’ program can be scheduled in background. In both of these cases all lines of the order gets pick released depending on the Picking rule used. If specific line needs to be pick release, it can be done from ‘Shipping Transaction form’. For this case Pick Release is done from ‘Release Sales Order’ form with Pick Confirm=NO.
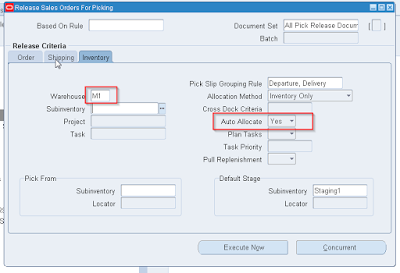
Shipping –> Release Sales Orders –> Release Sales Orders
=>In the Order tab, enter your order number.
=>In some cases, you may need to remove the defaulted ‘To’ value for ‘Scheduled Ship Dates’ and ‘Requested Dates’ fields, if the order line you created has a future date for these fields. Pick release will only consider lines within the dates specified.

Go to the Inventory tab and enter the warehouse M1. Set the following value if it is not defaulted.
Auto Allocate = Yes.
Make sure to include a Warehouse, based on this the order lines available on the order will be filtered. Choose Auto Allocate as “Yes” such that the system will suggest from which sub inventory or locator the goods can be shipped.
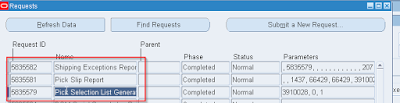
Once the Concurrent Button is pressed
Pick Select tin List Generation, Pick Slip report, Shipping Exception Reports are run in the background.
Some times the even the Programs are kicked off from the background Process the Status of the Delivery will not be updated to Staged/Pick Confirmed. In such case we need to pick release the Order from Navigate to Shipping –> Transactions Form and Select the Delivery Detail and Launch Pick Release and then Go button.

The tables which are effected by entering these transactions are:
WSH_PICKING_BATCHES
WSH_NEW_DELIVERIES
WSH_DELIVERY_ASSIGNMENTS apart from Material transactions Table.
Query to find out the shipper info;-
SELECT wnd.delivery_id delivery_id ,
substrb(hp.party_name,1,50) customer ,
wpb.name batch_name ,
wsh_util_core.get_location_description( wnd.INITIAL_PICKUP_LOCATION_ID, 'NEW UI CODE') ship_from,
wsh_util_core.get_location_description( wnd.ULTIMATE_DROPOFF_LOCATION_ID, 'NEW UI CODE') ship_to,
wnd.INITIAL_PICKUP_DATE pickup_date ,
wnd.ULTIMATE_DROPOFF_DATE dropoff_date ,
lv.meaning ship_method
wnd.WAYBILL waybill ,
wnd.GROSS_WEIGHT gross_weight ,
wnd.WEIGHT_UOM_CODE uom ,
wnd.status_code ,
we.message
FROM wsh_new_deliveries wnd,
wsh_picking_batches wpb ,
wsh_exceptions we ,
fnd_lookup_values_vl lv ,
hz_cust_accounts hca ,
hz_parties hp
WHERE wnd.delivery_id = 3777372
AND wpb.batch_id = wnd.batch_id
AND we.delivery_id(+) = wnd.delivery_id
AND we.exception_name(+) = 'WSH_BATCH_MESSAGE'
AND lv.lookup_code(+) = wpb.ship_method_code
AND lv.lookup_type(+) = 'SHIP_METHOD'
AND lv.view_application_id(+) = 3
AND hca.cust_account_id (+) = wnd.customer_id
AND hp.party_id(+) = hca.party_id
Query to find out the shipper detail info;-
SELECT wnd.delivery_id,
wnd.name delivery_name,
wdd.source_header_number so_order_number,
oola.line_number so_line_number,
wdd.source_header_id so_header_id,
wdd.source_line_id so_line_id,
wdd.shipping_instructions,
wdd.inventory_item_id,
wdd.requested_quantity_uom,
msi.description item_description,
msi.revision_qty_control_code ,
wdd.ship_method_code carrier,
wdd.shipment_priority_code priority,
wdd.organization_id,
wnd.initial_pickup_location_id,
wdd.released_status,
wdd.source_code
FROM mtl_system_items_vl msi,
oe_order_lines_all oola,
wsh_delivery_details wdd,
wsh_delivery_assignments wda,
wsh_new_deliveries wnd
WHERE wnd.delivery_id = 3777372
AND wda.delivery_id = wnd.delivery_id(+)
AND wdd.delivery_detail_id = wda.delivery_detail_id
AND wdd.inventory_item_id = msi.inventory_item_id(+)
AND wdd.organization_id = msi.organization_id(+)
AND wdd.source_line_id = oola.line_id
AND wdd.source_header_id = oola.header_id;
Ship Confirm :-
Navigate to Shipping > Transactions.
In the Query Manager screen, enter your order number in the From Order Number field and tab out. Then, click on the Find button. All non-shipped lines will appear. Click on the details button to see detailed line information.
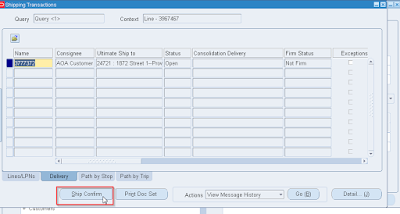
Notice the following in the Lines/LPNs tab.
Detail : The delivery detail of the shipment
Delivery : The delivery that got autocreated during pick release
Line Status : Staged/Pick Confirmed
Next Step : Ship Confirm/Close Trip Stop
Detail : The delivery detail of the shipment
Delivery : The delivery that got autocreated during pick release
Line Status : Staged/Pick Confirmed
Next Step : Ship Confirm/Close Trip Stop
SELECT source_header_number,
source_header_id ,
source_line_id ,
delivery_detail_id ,
released_status
FROM wsh_delivery_details
WHERE source_code = 'OE'
AND source_line_id = 399282;
Released_Status:= 'Y'
SELECT wnd.delivery_id,
wnd.status_code
FROM wsh_new_deliveries wnd,
wsh_delivery_assignments wda,
wsh_delivery_details wdd
WHERE wdd.delivery_detail_id = wda.delivery_detail_id
AND wda.delivery_id = wnd.delivery_id
AND wdd.delivery_detail_id = 3967467;
Status := OP
Click on the Delivery tab and the details button to see detailed delivery information. You can enter the waybill number & additional info etc. here. To ship confirm the order, select the Actions list in the Delivery Tab, choose Ship Confirm and GO.
The ship confirmation window will appear and give you the options to back order, ship all or ship partial quantities and set user defined shipping documents to print. Enter the trip creation options viz: Ship method, departure date, close trip and defer interface. The ship confirm process triggers the inventory interface automatically to update quantities, and triggers the Order Management Interface to update the status of the order lines.
Not checking the Defer Interface check box, as shown here, ensures that the next step, running the Interface Trip Stop (ITS) concurrent program, happens automatically. Deferring ITS (checking this box) means you need to run the concurrent in a separate step.
Interface Trip Stop (ITS) can be done from Shipping > Interfaces > Run (Interface Trip Stop – SRS).

Even if we get warning messages regarding the Carrier Code ignore at this point of time.
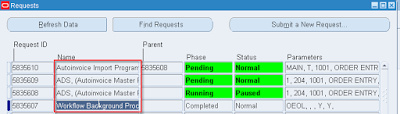
Go to View > Requests, and verify that the Interface Trip Stop completed successfully.
SELECT delivery_detail_id,
released_status ,
oe_interfaced_flag ,
inv_interfaced_flag
FROM wsh_delivery_details
WHERE source_code = 'OE'
AND source_line_id = 201594;
* released_status = C (Shipped) -- becomes Shipped after ship confirm, even before ITS
* oe_interfaced_flag = Y -- signifies ITS has interfaced shipping data to OM
* inv_interfaced_flag = Y -- signifies ITS has interfaced shipping data to INV
To check if the item has actually been shipped out of inventory.
Navigate to Inventory > Change Organization and select M1.
Navigate to Inventory > Transactions > Material Transactions
Navigate to Inventory > Change Organization and select M1.
Navigate to Inventory > Transactions > Material Transactions
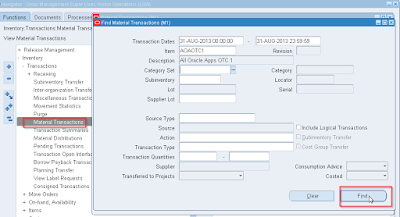
Enter the following information in the Find Material Transactions screen and click on Find
Transaction Date : Ensure the transaction date is within the range specified
Source Type : Sales Order
Source :
-Evoke the LOV and click on the button Combinations
-Enter your Sales Order Number and Order Type Mixed, then click OK
-Example : 66429.Mixed.ORDER ENTRY
Transaction Date : Ensure the transaction date is within the range specified
Source Type : Sales Order
Source :
-Evoke the LOV and click on the button Combinations
-Enter your Sales Order Number and Order Type Mixed, then click OK
-Example : 66429.Mixed.ORDER ENTRY
Go to the Transaction Type tab, and notice the line with Transaction Type = Sales Order Issue. This is the Inventory Transaction that happened when the item was shipped out of the warehouse M1, hence the negative quantity -1.
The other two lines with Transaction Type = Sales Order Pick, are for the move order transaction that happened automatically during Pick Release , when the item was moved from the pick-from sub inventory to the staging sub inventory. Hence there is one line each for a negative and positive transaction from/to each sub inventory. The final shipment to the customer (sales order issue) is made from the staging sub inventory.

Tables effected in this transactions are:
WSH_NEW_DELIVERIES, WSH_DELIVERY_DETAILS, WSH_DELIVERY_LEGS, WSH_TRIPS and WSH_TRIP_STOPS. Bill of loading info of the delivery
SELECT wnd.delivery_id delivery_id ,
wdi.sequence_number bol_number ,
wdi.bol_notify_party ,
wdi.port_of_loading ,
wdi.port_of_discharge ,
wnd.WAYBILL waybill ,
wnd.GROSS_WEIGHT gross_weight ,
wnd.WEIGHT_UOM_CODE uom ,
wnd.status_code
FROM wsh_new_deliveries wnd ,
wsh_delivery_legs wdl ,
wsh_document_instances wdi
WHERE wnd.delivery_id = 3777372
AND wnd.delivery_id = wdl.delivery_id (+)
AND wdi.entity_id (+) = wdl.delivery_leg_id
AND wdi.entity_name (+) = 'WSH_DELIVERY_LEGS'
AND wdi.document_type (+) = 'BOL'
AND wdi.status (+) <> 'CANCELLED'
Delivery leg and pick up stop info
SELECT wt.trip_id ,
wt.name ,
wt.STATUS_CODE ,
wt.VEHICLE_ITEM_ID ,
wt.VEHICLE_NUMBER ,
wt.CARRIER_ID ,
wt.SHIP_METHOD_CODE ,
wts.STOP_ID ,
wts.STOP_LOCATION_ID ,
wts.STATUS_CODE ,
wts.STOP_SEQUENCE_NUMBER ,
wts.PLANNED_ARRIVAL_DATE ,
wts.PLANNED_DEPARTURE_DATE,
wts.ACTUAL_ARRIVAL_DATE ,
wts.ACTUAL_DEPARTURE_DATE ,
wts.DEPARTURE_NET_WEIGHT ,
wts.WEIGHT_UOM_CODE ,
wdl.DELIVERY_LEG_ID ,
wdl.DELIVERY_ID ,
wdl.PICK_UP_STOP_ID ,
wdl.DROP_OFF_STOP_ID ,
wdl.SEQUENCE_NUMBER ,
wdl.LOADING_ORDER_FLAG ,
wdl.SHIPPER_TITLE ,
wdl.SHIPPER_PHONE
FROM wsh_trips wt ,
wsh_trip_stops wts ,
wsh_delivery_legs wdl
WHERE wdl.delivery_id = 3777372
AND wts.stop_id = wdl.pick_up_stop_id
AND wts.trip_id = wt.trip_id;
Create Invoice : -
When the work flow Background Process is run it picks those records and post it to RA_INTERFACE_LINES_ALL. This is also called Receivables interface, that mean information moved to accounting area for invoicing details. Invoicing workflow activity transfers shipped item information to Oracle Receivables. At the same time records also goes in the table RA_INTERFACE_SALESCREDITS_ALL which hold details of sales credit for the particular order.
After the Workflow background Process is run RA_INTERFACE_LINES_ALL (interface table into which the data is transferred from order management). Then Autoinvoice program imports data from this table which get affected into this stage are receivables base table. At the same time records gets inserted into RA_CUSTOMER_TRX_ALL gets inserted with TRX_NUMBER ia the invoice number with INTERFACE_HEADER_ATTRIBUTE1 as Sales Order Number.
RA_CUSTOMER_TRX_LINES_ALL gets populated with LINE_ATTRIBUTE_1 and LINE_ATTRIBUTE_6 are populated with Sales order number and order lines LINE_ID respectively.
RA_CUSTOMER_TRX_LINES_ALL gets populated with LINE_ATTRIBUTE_1 and LINE_ATTRIBUTE_6 are populated with Sales order number and order lines LINE_ID respectively.
After this the OE_ORDER_LINES_ALL gets updated with FLOW_STATUS_CODE to ‘Closed’ and OPEN_FLAG to ‘N’.
Create Receivable Invoice :-
check the status of the order line.
Navigate to the sales order form, and query your sales order. Go to the Line Items tab and check that the status of the line is ‘Shipped’.
While still on the line, go to Tools > Workflow Status.
Navigate to the sales order form, and query your sales order. Go to the Line Items tab and check that the status of the line is ‘Shipped’.
While still on the line, go to Tools > Workflow Status.


Verify that the order line workflow is now at the Fulfill – Deferred activity with a status of Deferred. This means that the next steps is to run the Workflow Background Process.
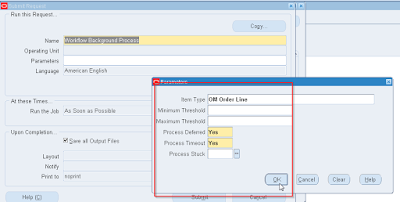
Navigate to Reports, Requests > Run Requests.
Run the Workflow Background Process with the following parameters.
Item Type : OM Order Line
Process Deferred : Yes
Process Timeout : Yes
Run the Workflow Background Process with the following parameters.
Item Type : OM Order Line
Process Deferred : Yes
Process Timeout : Yes
Go to View > Requests, and verify that the Workflow Background Process (WFBP) has completed successfully. In addition, notice that the AR concurrent requests Autoinvoice and Autoinvoice Import Program get kicked off automatically to import the invoices into AR. OM inserts invoice data into the AR interface tables through ‘Invoice Interface’, which runs in the background (notice the workflow activity ‘Invoice Interface’ in the screenshot from Step 4 below). AR picks up the data from the interface tables through the ‘Autoinvoice’ concurrent program.
Once the data is interfaced to AR or AR Interface Tables the status of the order Lines will be changed to Closed.
Query the order in the sales order form, and go to the lines. Notice the status is now Closed. Note that the Closed status in the order lines signifies that OM has successfully passed the invoice data into the AR interface tables, and does not necessarily signify that the invoice has been successfully imported into AR (in case there was some error during that process).

The workflow status for the order line (go to Tools > Workflow Status) should now be Ended.

Once the Auto invoice program is Run you can see the AR Invoice Created. To check this Change the Responsibility to Receivables, Vision Operations(USA), Transactions –> Transactions and query for Source as ORDER ENTRY and Reference as the Sales Order number 66429.
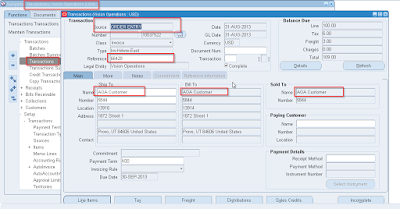
The data is inserted into RA_CUSTOMER_TRX_ALL with interface header attribute1 will store the Sales Order Number and RA_CUSTOMER_TRX_LINES_ALL with interface line attribute6 having the sales order line Id stored.
Note:-Some time the Auto invoice Import Program might not invoice the Lines and the instance might have issues like opening Periods. To Open the GL Periods Navigate to Control –> Accounting –> Open/Close Periods and Open the Period which the System Date falls in.

Create receipt: Receivables> Receipts> Receipts
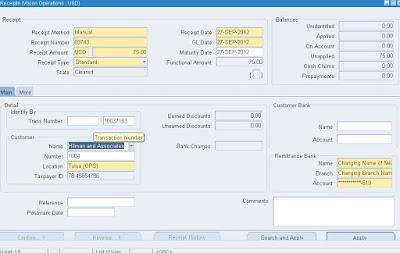
Click Apply to apply this to an invoice and then select the invoice in next screen and then apply.

Tables affected:
AR_CASH_RECEIPTS_ALL
Transfer to General Ledger:-
To transfer the Receivables accounting information to general ledger, run General Ledger Transfer Program
Receivables> View Requests
Parameters:
Give in the Start date and Post through date to specify the date range of the transactions to be transferred.
Specify the GL Posted Date, defaults to SYSDATE.
Post in summary: This controls how Receivables creates journal entries for your transactions in the interface table. If you select ‘No’, then the General Ledger Interface program creates at least one journal entry in the interface table for each transaction in your posting submission. If you select ‘Yes’, then the program creates one journal entry for each general ledger account.
If the Parameter Run Journal Import is set to ‘Yes’, the journal import program is kicked off automatically which transfers journal entries from the interface table to General Ledger, otherwise follow the topic Journal Import to import the journals to General Ledger manually.

Tables Affected: GL_INTERFACE
Journal Import:-
To transfer the data from General Ledger Interface table to General Ledger, run the Journal Import program from Oracle General Ledger.
General Ledger > Journa> Import> Run
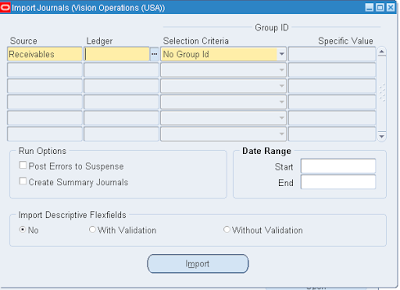
Affected tables
GL_JE_BATCHES, GL_JE_HEADERS, GL_JE_LINES
Posting:-
We have to Post journal batches that we have imported previously to update the account balances in General Ledger
General Ledger> Journals > Enter

Click Find
From the list of unposted journals displayed, select one journal at a time and click on Post button to post the journal.

If you know the batch name to be posted you can directly post using the Post window
